Categories
To point your domain name to your vps you need to:
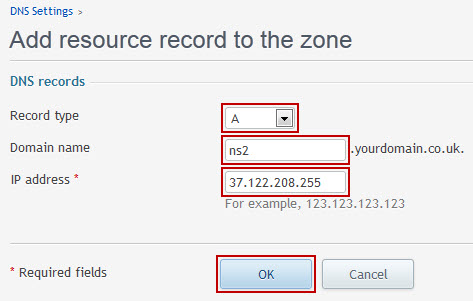
1) Login to your registrar’s account and create 2 sub-domains for your desired domain. You can call them NS1.yourdomain.com and NS2.yourdomain.com
2) Point your newly created ns1 and ns2 to your server ip address (note: some registrars will require you to have 2 unique IP addresses)
3) Last step is to change your domain’s dns servers again from your registrar’s control panel to your newly created ns1.yourdomain.com and ns2.yourdomain.com
After all 3 steps are completed successfully it might take up to 24 hours for all changes to take effect.
4) Install and configure BIND on your vps
Unless you prefer to install bind from a source code the installation is rather simple. On a Debian or Ubuntu Linux server you can install a bind nameserver with a following command:
apt-get install bind9 dnsutils
CentOS or Fedora alternative:
yum install bind dnsutils
dnsutils is not compulsory package to run bind webserver, but we will use a dig command which is part of this package as a testing tool of your bind configuration.
At this stage we will need to create a new zone file for a domain linuxconfig.org. Navigate to /etc/bind/ directory execute following sequence of commands to navigate to zones/master/
cd /etc/bind
mkdir -p zones/master
cd zones/master/
/etc/bind/zones/master directory will contain a zone file for a linuxconfig.org domain. If you prefer to use another directory to hold this file you are free to do so. The following zone file db.linuxconfig.org will hold a DNS record to assist a nameserver resolve a fully qualified domain name to an IP address. Create and save db.linuxconfig.org with a following content:
;
; BIND data file for linuxconfig.org
;
$TTL    3h
@       IN      SOA     ns1.linuxconfig.org. admin.linuxconfig.org. (
                          1        ; Serial
                          3h       ; Refresh after 3 hours
                          1h       ; Retry after 1 hour
                          1w       ; Expire after 1 week
                          1h )     ; Negative caching TTL of 1 day
;
@       IN      NS      ns1.linuxconfig.org.
@       IN      NS      ns2.linuxconfig.org.


linuxconfig.org.    IN      MX      10      mail.linuxconfig.org.
linuxconfig.org.    IN      A       192.168.0.10
ns1                     IN      A       192.168.0.10
ns2                     IN      A       192.168.0.11
www                     IN      CNAME   linuxconfig.org.
mail                    IN      A       192.168.0.10
ftp                     IN      CNAME   linuxconfig.org.
Here is just a quick review of some lines from the above bind DNS zone file:
PTR
;
; BIND reverse data file for 0.168.192.in-addr.arpa
;
$TTL    604800
0.168.192.in-addr.arpa.      IN      SOA     ns1.linuxconfig.org. admin.linuxconfig.org. (
                          1         ; Serial
                          3h       ; Refresh after 3 hours
                          1h       ; Retry after 1 hour
                          1w       ; Expire after 1 week
                          1h )     ; Negative caching TTL of 1 day
;
0.168.192.in-addr.arpa.       IN      NS      ns1.linuxconfig.org.
0.168.192.in-addr.arpa.       IN      NS      ns2.linuxconfig.org.

10.0.168.192.in-addr.arpa.   IN      PTR     linuxconfig.org.
zone "linuxconfig.org" {
       type master;
       file "/etc/bind/zones/master/db.linuxconfig.org";
};

zone "0.168.192.in-addr.arpa" {
       type master;
       file "/etc/bind/zones/master/db.192.168.0";
};
Last thing before we go ahead to check a configuration is to add and IP address af a stable DNS server to a named.conf.options file. This IP address is used in case that a local DNS server do not know the answer the a name resolution query. In IP address of a DNS server in many cases is provided by your Internet provider. Alternatively if you are google fan use 8.8.8.8 or 8.8.4.4.
Replace a following blog of text withing a named.conf.options file:
       // forwarders {
       //      0.0.0.0;
       // };
with new stable DNS server IP address
        forwarders {
              8.8.4.4;
         };
named-checkconf
With this named-checkconf command the rule is: no news are good news. If no output had been produced your config files looks OK.
To check a DNS zone files we can use named-checkzone command:
named-checkzone linuxconfig.org /etc/bind/zones/master/db.linuxconfig.org
zone linuxconfig.org/IN: loaded serial 1
OK
reverse zone file check:
named-checkzone 0.168.192.in-addr.arpa /etc/bind/zones/master/db.192.168.0
zone 0.168.192.in-addr.arpa/IN: loaded serial 2
OK
At this point nothing can stop us to run bind9 dns server:
 /etc/init.d/bind9 start
Starting domain name service...: bind9.
Alternatively, if your bind server is already running use a following command to to assist you with its restart:
/etc/init.d/bind9 restart
Stopping domain name service...: bind9.
Starting domain name service...: bind9.
A dig command from dnsutils package will become handy to help us to test a new configuration of bind nameserver.
dig command can be used from any PC which has a network access the your DNS server but preferably your should start your testing from a localhost. In our this case the IP address of our name server is 192.168.135.130. First we will test host-to-IP resolution:
dig @192.168.135.130 www.linuxconfig.org

; <<>> DiG 9.6-ESV-R1 <<>> @192.168.135.130 www.linuxconfig.org
; (1 server found)
;; global options: +cmd
;; Got answer:
;; ->>HEADER<
Next we test IP-to-host resolution:
dig @192.168.135.130 -x 192.168.0.10

; <<>> DiG 9.6-ESV-R1 <<>> @192.168.135.130 -x 192.168.0.10
; (1 server found)
;; global options: +cmd
;; Got answer:
;; ->>HEADER<
Originally posted on January 19, 2016 @ 6:55 pm
Thanks for this tutorial. But to start with, at the stage 2, you made doing we of two different ip address for the nameserver, ns1 and ns2, but in my own case, I have only one IP address, should i use the one IP address i have for the two nameserver, ns1 and ns2?
Yes, you can use 1 IP. But you can tell your host you need 1 additional IP if you want more IPs.